You’ve probably noticed too how GitHub is fast becoming the go-to platform for companies and enterprises navigating the digital landscape. It’s an exciting shift, but it’s not without its challenges, especially when it comes to working with cloud services. Take Azure Key Vault and Azure Container Registry (ACR), for instance. To work smoothly, these services require certain secrets, like access keys. But here’s the catch – managing these secrets raises some serious security concerns.
That’s where Azure Federated Credentials, backed by Microsoft Entra Identity (formerly known as AD), come into play. They’re designed to solve this exact problem. Now, I know this has been around for a while, but I’ve seen many folks still scratching their heads over it. So, I thought, why not break it down with some real-world examples? Stick around, and I’ll walk you through how to seamlessly integrate GitHub with Azure using these federated credentials, making your life a whole lot easier and your projects more secure. Let’s dive in!
Microsoft Entra ID and Federated Credentials
Let’s start by demystifying Microsoft Entra Identity and Federated Credentials. If you’re not familiar with these terms, don’t worry – I was in the same boat not too long ago. Microsoft Entra Identity, formerly known as Azure Active Directory (AD), is the backbone of identity management in the Azure ecosystem. It’s like a digital ID card for your applications, ensuring that only authorized users and services can access your resources. Now, enter Federated Credentials. These are a game-changer in the way they simplify secure access to cloud resources.
How do they work? Federated Credentials use OpenID Connect (OIDC) – an authentication layer on top of OAuth 2.0. In simpler terms, it’s like having a universal key that grants your applications secure access to various services without the need for multiple passwords or secrets. Think of it as a streamlined, more secure way to manage access. By integrating with Identity Access Management (IAM), Federated Credentials provide a robust framework for defining who gets access to what. It’s all about giving the right level of access to the right entities, minimizing security risks.
Now, what’s our plan? We’re going to take a hands-on approach to this. We’ll assign a specific role to an application registration in Azure, and then, using OIDC, we’ll access it directly from GitHub. This might sound a bit technical, but trust me, it’s a lot simpler than it seems, and the benefits are huge. So, stay tuned and get ready to see how all these pieces fit together to create a secure, efficient workflow!
Creating an App Registration and Granting Federated Access to Your GitHub Repo
Understanding App Registrations: First things first, let’s talk about what an App Registration is. In the simplest terms, it’s like creating an identity for your application within the Azure platform. This identity allows your application to interact with Azure services and resources securely.
Setting Up Federated Access:
Initiating the Process: Start by heading over to Microsoft Entra and selecting ‘App registrations’, and creating one call it github-workflow, we are going to use this name. otherwise remember what you called it!
Open your app registration and click on ‘Certificates & secrets’. Here, you’ll find a tab labeled ‘Federated credentials’. Click on ‘+ Add Credential’ to begin setting up federated access for your GitHub repository.
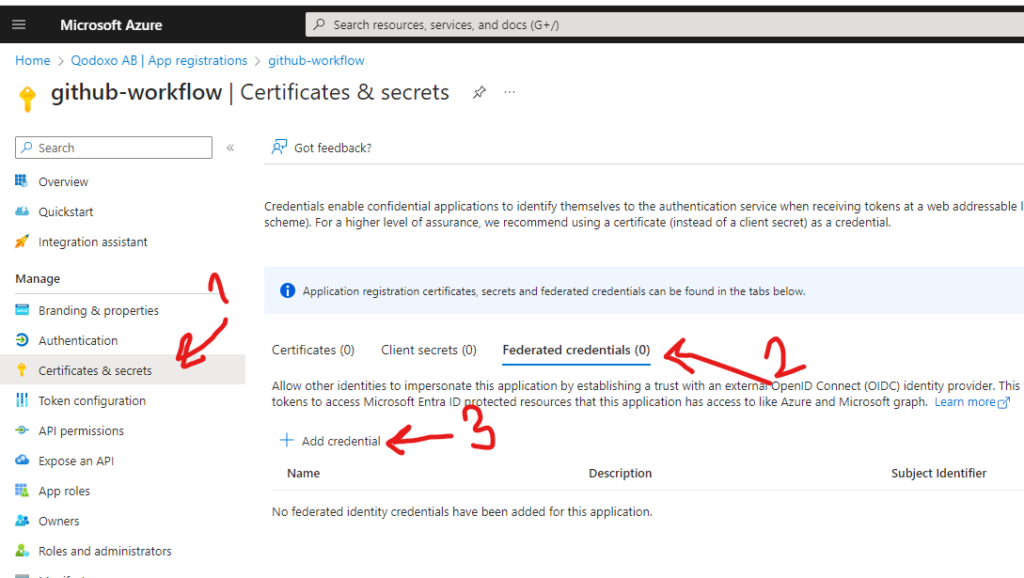
Configuring the Credential: In the setup screen, you’ll see a dropdown for ‘Federated credential scenario’. Choose “GitHub Actions Deploying Azure Resources.” This is particularly tailored for integrating GitHub Actions with Azure.
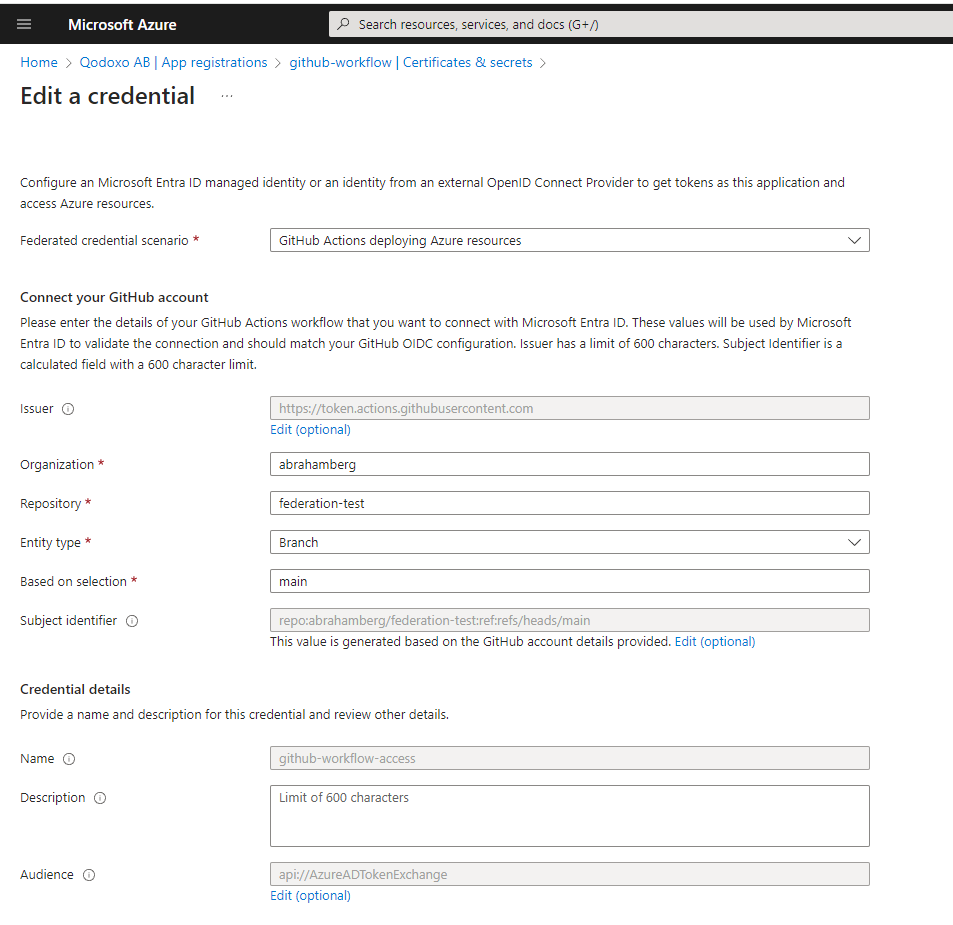
Specifying Repository Details: You need to specify the organization and repository for which you’re creating this federated access. For example, if your repo URL is “https://github.com/abrahamberg/federation-test“, you’ll enter abrahamberg as organization and federatuib-test as repository .
Selecting Subject Identifier: This is a crucial step. The subject identifier is what establishes the link between your GitHub Actions workflow and Microsoft Entra ID. It’s automatically generated based on the GitHub details you provide. In real-world projects, I often choose ‘Environment’ as the subject identifier, although you can also select ‘Tag’ or ‘Pull Request’, and ‘Branch’ depending on your needs. To keep it simple lets do it by Branch today.
Choosing the Branch: Under the section for GitHub branch name, select the branch you intend to deploy from – it could be ‘main’, ‘master’, or any other branch you’re working with.
Credential Details: Give your credential a name for easy identification. This step is pretty straightforward.
It’s interesting to note that you can create federations for repositories you don’t own. Essentially, as the owner of Azure resources, you’re granting access to trusted GitHub repositories. This feature can be incredibly useful for collaborative projects.
By following these steps, you’ve successfully created an App Registration in Azure and granted it federated access to your GitHub repository. This setup is pivotal for securely managing deployments and operations between GitHub and Azure.
Setting Access to Azure Container Registry ARC via IAM
Here we are assigning role of AcrPush to our App Registration, if you know how to do it just do it otherwise you are welcome to read instructions below:
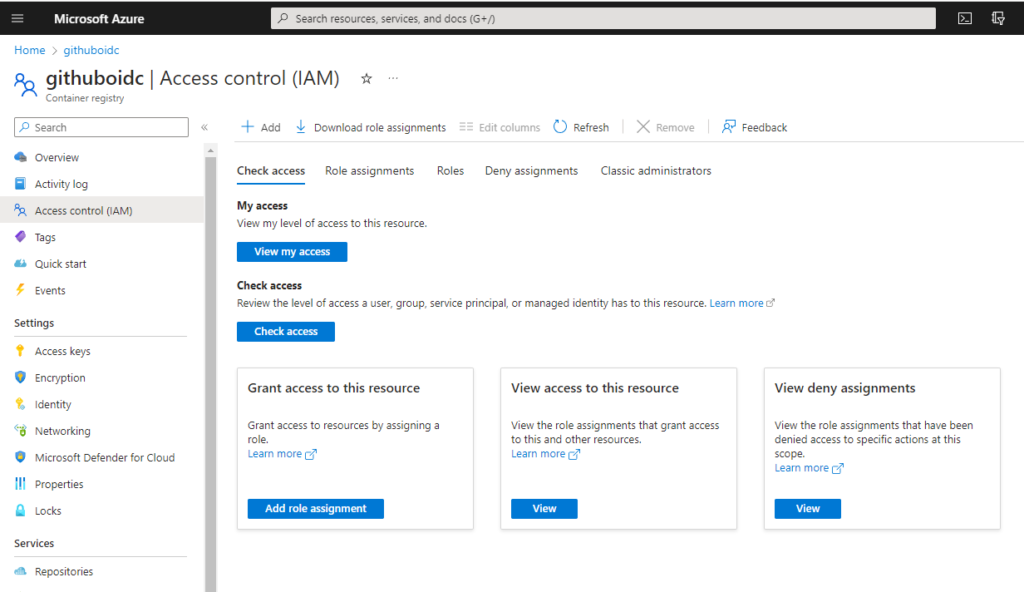
Navigating to Azure Container Registry:
Begin by either creating a new Azure Container Registry (ACR) or going to an existing one in your Azure portal. This registry is where you’ll store and manage your container images, so make sure it’s properly set up to align with your project requirements.
Adding a Role Assignment:
Once inside your ACR click on Access control (IAM) from the side menu, look for the option ‘+ Add’ and select ‘Add role assignment’. This step is crucial as it defines the permissions for different users and services interacting with your ACR.
Configuring Role and Members:
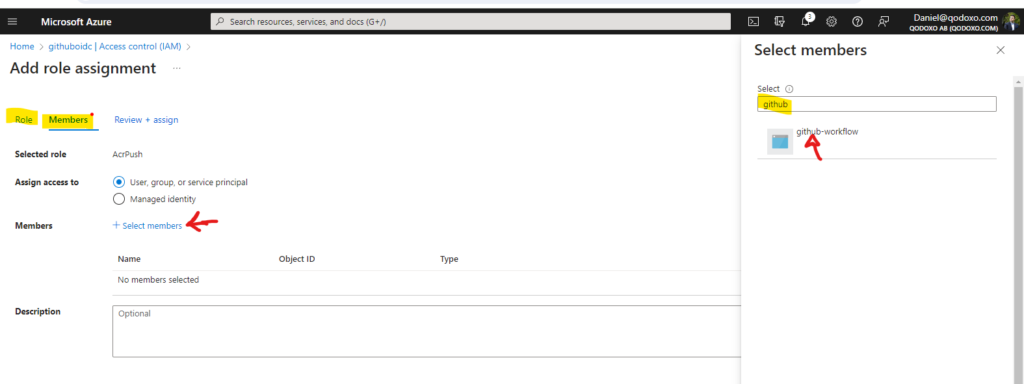
- Selecting the Role: In the role assignment screen, you’ll find a ‘Role’ tab. Here, choose the role ‘AcrPush’. This specific role allows for pushing images to your container registry, which is a fundamental action for most CI/CD pipelines involving containerized applications.
- Adding Members: Next, switch to the ‘Members’ tab. Here, click on ‘+ Select members’. This action opens a side window where you can search for the specific identity you want to grant access to.
- Searching for App Registration: Now, it’s time to link everything back to our GitHub integration. Search for ‘github-workflow’ in the search bar. Remember, ‘github-workflow’ is the name we gave to our App Registration earlier. If you’ve named yours differently, be sure to search for that specific name.
- Selecting the App Registration: Once you find ‘github-workflow’ (or your named App Registration) in the search results, click on it and then select ‘Select’. This action adds the App Registration as a member with the ‘AcrPush’ role.
- Finalizing the Assignment: After selecting the appropriate member, proceed to ‘Review + assign’. This will finalize the role assignment, granting your GitHub workflow the necessary permissions to push images to the Azure Container Registry.
By completing these steps, you’ve effectively bridged your GitHub actions with your Azure Container Registry, ensuring a smooth and secure pipeline for deploying your containerized applications. This integration is key to automating your deployment process and maintaining high standards of security and efficiency.
Integrating Azure Key Vault with GitHub Actions
Understanding Azure Key Vault in CI/CD: While GitHub Actions offers a robust secret management system, there are scenarios where you might prefer to store sensitive information in Azure Key Vault. This service provides an extra layer of security, especially for critical secrets. In this subsection, we’ll explore how to access a secret stored in Azure Key Vault from GitHub Actions.
Setting Up Access Control for Key Vault:
Assigning the Role: Just as we did with the Azure Container Registry, navigate to your Azure Key Vault in the Azure portal. Here, you’ll again use the Access Control (IAM) feature to manage permissions. This time, you’re assigning the role of “Key Vault Secrets User” to your App Registration, named ‘github-workflow’ (or whatever name you chose). This role enables the GitHub workflow to read the contents of the secrets stored in the Key Vault.
Ensuring Proper Ownership:
Checking Ownership: If you’re not set as the owner of the Key Vault (which can happen depending on your initial setup), you’ll need to rectify this. Being the owner gives you full control over the Key Vault, including managing access and secrets.
Assigning Ownership: In the Access Control (IAM) section, find the “Privileged administrator roles” tab. Here, assign the ‘Owner’ role to yourself. This step is crucial for maintaining control over your Key Vault.
Adding a Secret to Key Vault:
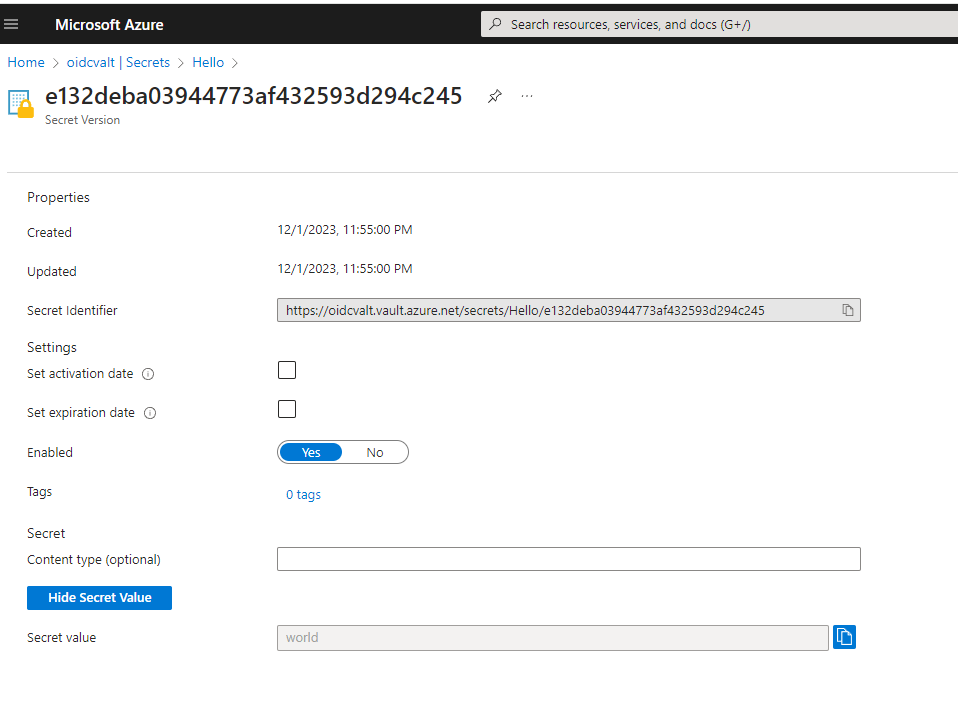
- Creating a New Secret: Now that you have the necessary permissions, it’s time to add a secret to your Key Vault. Navigate to the ‘Secrets’ section within your Key Vault.
- Adding the Secret: Click on ‘Add’ to create a new secret. For demonstration purposes, let’s name the secret “Hello” and assign it the value “World”. This secret will be what we’ll access from our GitHub Actions.
By following these steps, you’ve successfully set up your Azure Key Vault to work in tandem with GitHub Actions. This integration not only enhances the security of your CI/CD pipeline but also provides a centralized and secure way to manage sensitive information.
Setting Up GitHub for Azure Integration
Setting GitHub Secrets:
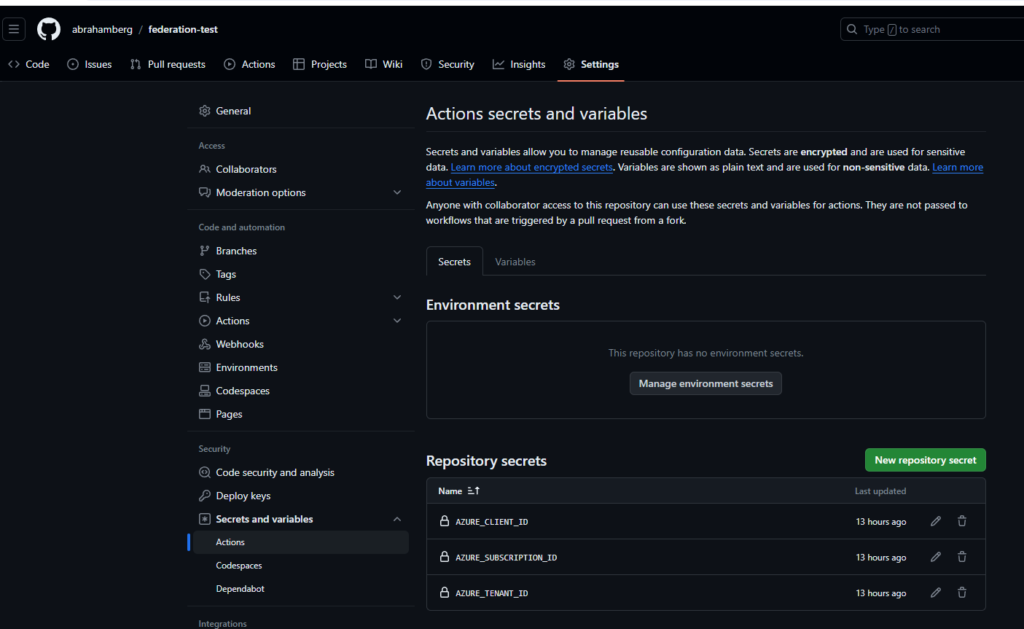
Accessing Repository Settings: First, navigate to the GitHub repository you’ve granted access to Azure. Make sure you have admin privileges for this repository. Go to ‘Settings’, then find ‘Secrets and variables’ and select ‘Actions’.
Creating Repository Secrets: Under ‘Repository secrets’, you need to create and populate three secrets: AZURE_CLIENT_ID, AZURE_SUBSCRIPTION_ID, and AZURE_TENANT_ID. You can retrieve these values as follows:
AZURE_CLIENT_ID: From your app registration overview, look for “Application (client) ID”.AZURE_TENANT_ID: This is the “Directory (tenant) ID” from the same overview.AZURE_SUBSCRIPTION_ID: You can find this in your Key Vault or Azure Container Registry (ACR) overview.
Setting Up the Workflow:
Dockerfile Requirement: Ensure you have a Dockerfile at the root of your repository, as this is necessary for the workflow to execute correctly.
Workflow Configuration: Here’s how you set up your GitHub Actions workflow:
name: Demo
on:
workflow_dispatch:
permissions:
id-token: write
contents: read
jobs:
build-and-deploy:
runs-on: ubuntu-latest
steps:
- name: Checkout code
uses: actions/checkout@v3
- name: Login to Azure AD
uses: azure/login@v1
with:
client-id: ${{ secrets.AZURE_CLIENT_ID }}
tenant-id: ${{ secrets.AZURE_TENANT_ID }}
subscription-id: ${{ secrets.AZURE_SUBSCRIPTION_ID }}
- name: DEMO see You are logged in
run: |
az account show # Test login
az group list # Test login
- name: Docker login to Azure
run: |
az acr login --name githuboidc.azurecr.io
- name: Build and push
uses: docker/build-push-action@v5
with:
push: true
tags: githuboidc.azurecr.io/federation-test:latest
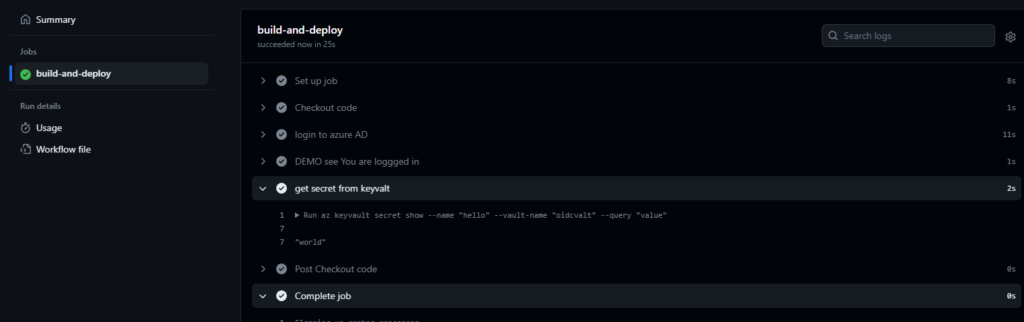
- name: Get secret from Key Vault
run: |
az keyvault secret show --name "hello" --vault-name "oidcvalt" --query "value"This workflow does several things:
- Checks out your code from the repository.
- Logs into Azure AD using the secrets set earlier.
- Demonstrates that the login was successful by running Azure CLI commands.
- Logs into the Azure Container Registry.
- Builds your Docker image and pushes it to ACR.
- Retrieves a secret from Azure Key Vault.
By setting up these GitHub secrets and the workflow, you’re enabling a secure, automated process for building and deploying your application, while also securely handling secrets through Azure Key Vault. This integration not only streamlines your deployment pipeline but also ensures that sensitive information is handled in a secure and compliant manner.
Also read :
external:
- Identity credentials in Microsoft Entra ID
- Automating Security Protocols: How Platform Engineering Builds Safer Systems
Leave a Reply