On the previous article, we installed a SonarQube community server on ubuntu and using SQL server. Now We are going to expand our learnings and create the whole process of code quality assurance with SonarQube. We are making a CI/CD workflow so that any line of new code be scanned and measured by SonarQube. This way, if the code does not meet the required quality the pull request blocks and low quality code can not be merged to our code base.
You can achieve the pull request quality check in different git platforms like Azure DevOps, Jenkins , TeamCity and … today we are covering GitHub and SonarQube community. Note that the process is identical on SonarQube commercial versions, you only need to skip the installing community branch plugin because this feature comes out of the box in commercial versions
Installing plugin to enable SonarQube Community branch and pull request scanning
We are going to use sonarqube-community-branch-plugin to get the feature that we need to be able to scan a pull request and block it does not pass our quality gates.
You find releases here. In case you are using other version of SonarQube than the 8.9 (current LTS), you need to visit the link above and find the correct version for your installation.
At the previous post, I showed you how to install SonarQube on a Ubuntu. I imagine you have a similar setup AKA your SonarQube is installed on /opt/sonarqube/ . If not, please feel free to modify the commands before running them.
We start with coping the plugin jar file to our installation at /opt/sonarqube/extensions/plugins/sonarqube-community-branch-plugin.jar (our case we downloaded version 1.14.0; Note: This version supports SonarQube 9.8 and above. SonarQube 9.7 and below are not supported in this release )
sudo wget -O /opt/sonarqube/extensions/plugins/sonarqube-community-branch-plugin.jar https://github.com/mc1arke/sonarqube-community-branch-plugin/releases/download/1.14.0/sonarqube-community-branch-plugin-1.14.0.jarNow that we have the plugin in place we need to edit the config/sonar.properties file too. Please open the file in nano editor.
sudo nano /opt/sonarqube/conf/sonar.propertiesWe need to update 2 places in this file: sonar.web.javaAdditionalOpts and sonar.ce.javaAdditionalOpts. When in nano editor, press Ctrl+W to quickly find each of highlighted. By default, they are commented like this:
#-------------------------------------------------------------------------------------------->
# WEB SERVER
# Web server is executed in a dedicated Java process. By default heap size is 512MB.
# Use the following property to customize JVM options.
#    Recommendations:
#
#    The HotSpot Server VM is recommended. The property -server should be added if server mode
#    is not enabled by default on your environment:
#    http://docs.oracle.com/javase/8/docs/technotes/guides/vm/server-class.html
#
#    Startup can be long if entropy source is short of entropy. Adding
#    -Djava.security.egd=file:/dev/./urandom is an option to resolve the problem.
#    See https://wiki.apache.org/tomcat/HowTo/FasterStartUp#Entropy_Source
#
#sonar.web.javaOpts=-Xmx512m -Xms128m -XX:+HeapDumpOnOutOfMemoryError
# Same as previous property, but allows to not repeat all other settings like -Xmx
#sonar.web.javaAdditionalOpts=
Please uncomment them (remove # from beginning of the line) and set them as this (see last line of example above):
sonar.web.javaAdditionalOpts=-javaagent:./extensions/plugins/sonarqube-community-branch-plugin.jar=webAnd also:
sonar.ce.javaAdditionalOpts=-javaagent:./extensions/plugins/sonarqube-community-branch-plugin.jar=ceExit nano with Ctrl+X and then Y to save your changes.
Now, your SonarQube community is very similar to the commercial version of SonarQube(for free)!
At this point restart we should restart SonarQube so changes make effects. (we give our services name sonar as the previous article you might have another name)
sudo systemctl stop sonar && sudo systemctl start sonarGive it some time until SonarQube is started (you are going to see SonarQube is starting message for a few minutes)
Login, and you should see the dialog of Installation of plugins . Click on I underrated the risk and the plugin should be up and running.
SonarQube GitHub Setting
Create a github app
So far, we solved the problem of branch scanning of SonarQube Community. instruction from now is good for both paid and free version of SonarQube. We start with a pull request status check on GitHub.
Status check works like this :
You make a pull request on GitHub > A workflow being triggered on GitHub to build , run tests and gather information for SonarQube and submit it to your SonarQube server > SonarQube evaluates data and based on quality gates results and sends a Pass or Fail status back to GitHub > GitHub blocks your pull request until it receives the Pass status.
For the integration works fully, you need to make a (so called) GitHub App. It is not really an app though, it is just a setting that lets an external application communicate with GitHub. Please make a GitHub app according to instructions here and comeback!
Your app should have these permissions:
- Read access to code, commit statuses, metadata, and repository projects
- Read and write access to checks and pull requests
Integrate your sonarQube with GitHub
Now that you have the app in place, we can make GitHub integration on our SonarQube server:
Login to your SonarQube instance as an admin and head to Administration , select ALM Integrations and then GitHub. Click the button [Create configuration]
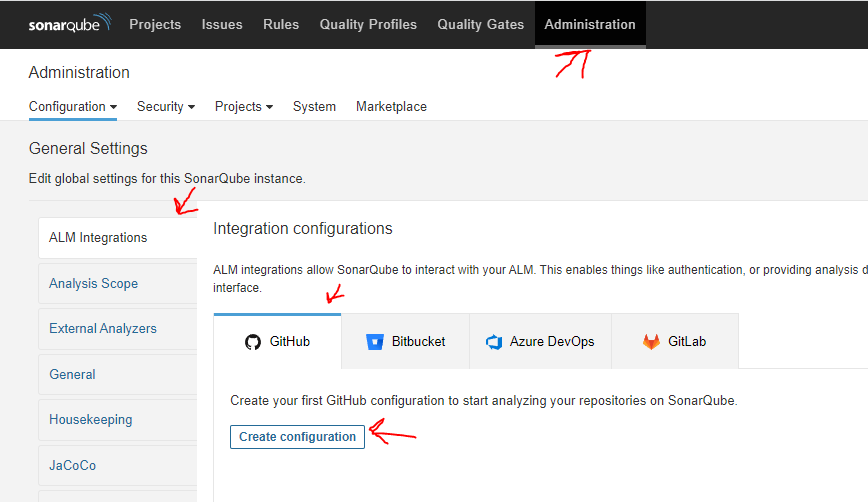
Most of information needed you find on your GitHub app. Your setting should be something like this :
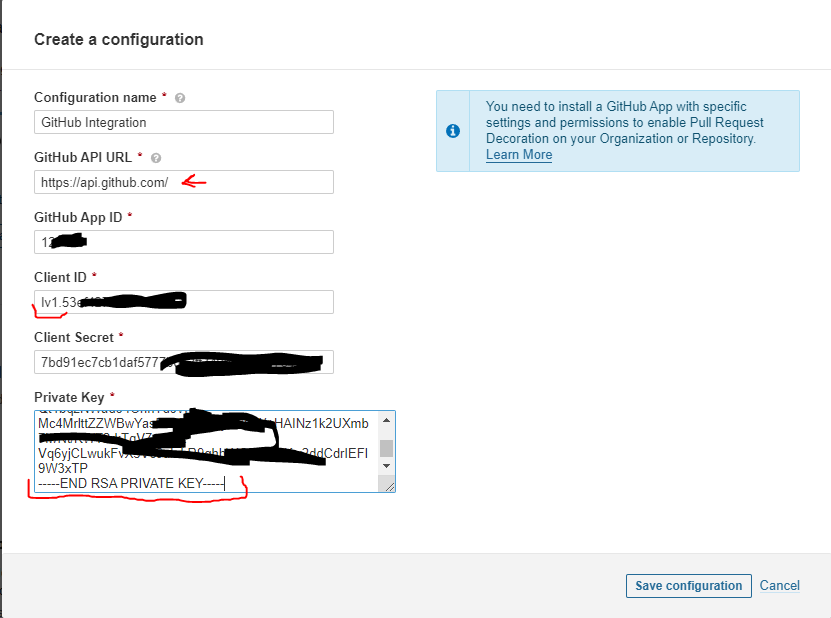
Note :check your firewall settings and make sure you open https port on your server so your server can communicate with https://api.github.com
If things goes good you should see something like this :
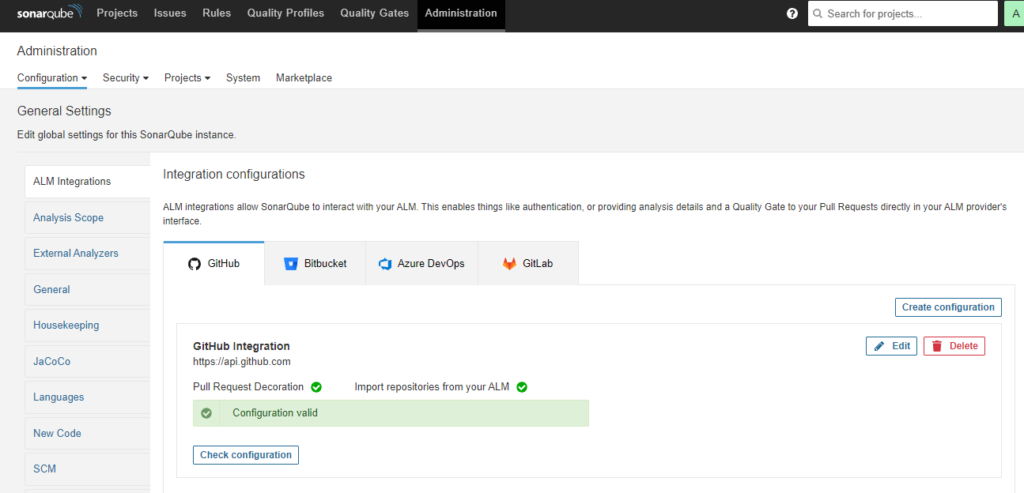
On your SonarQube, from the menu go to your Projects and click Add Project button. After setting up the integration, you should get a GitHub alternative

Click on that and all your projects from GitHub should be listed. Select a project and click on setup selected repository.
Next step is about the way want to analyze your repository? Click on With Github
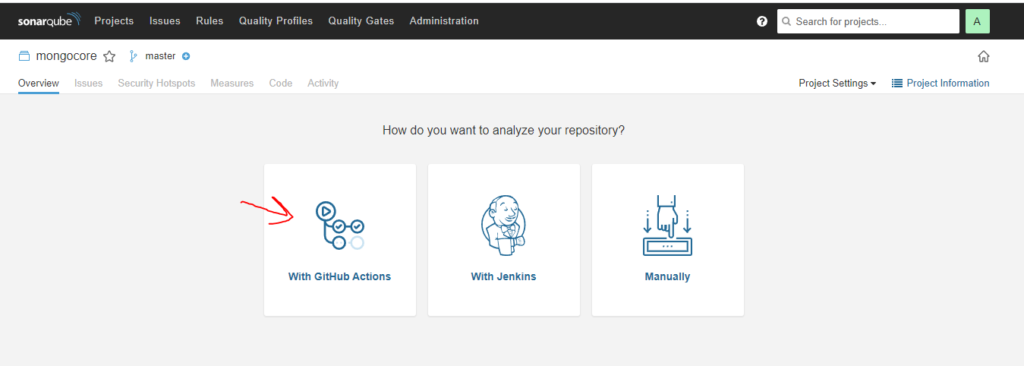
follow instructions at this step on GitHub in 2 steps
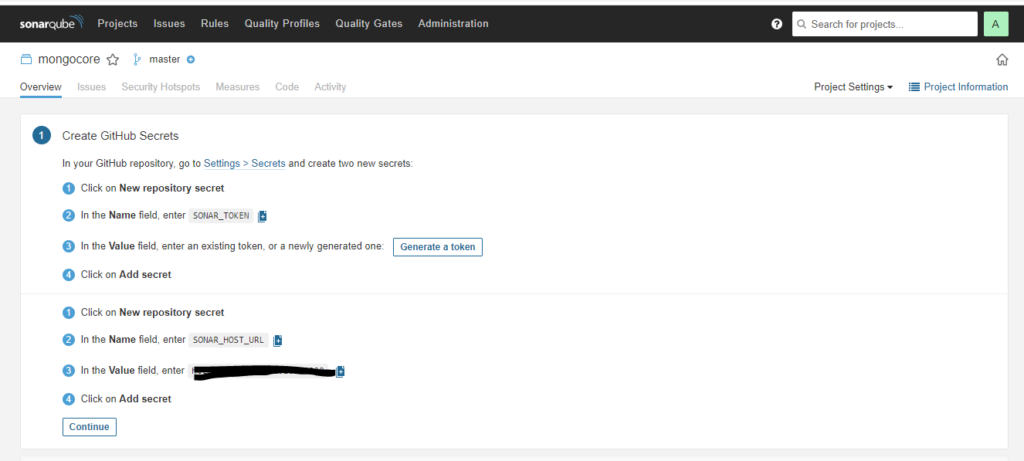
As result you should have 2 secrets (SONAR_TOKEN ,SONAR_HOST_URL ) and a workflow (.github/workflows/build.yml) . The secrets are used in your workflow
Make sure your default repository name on line 5 of your workflow is correct (master / main)
On your GitHub repo head to tab Actions and you see your workflow is running

Wait until it finishes and the orange dot becomes green (If it becomes red, you need to manually inspect your workflow)
As soon as workflow finished your SonarQube is going to be updated and look like this :
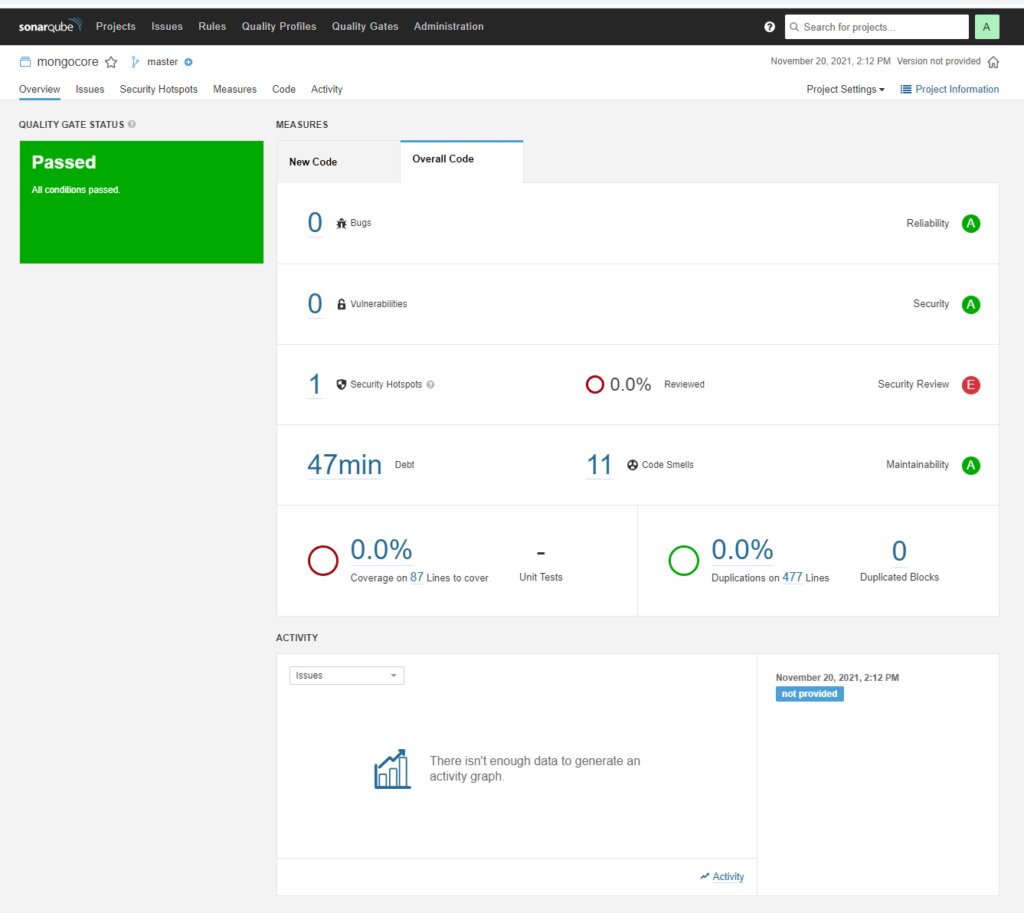
It tells you about the code smells , security hotspots and duplications.
Head to Projects settings and Pull Request Decoration Tab.
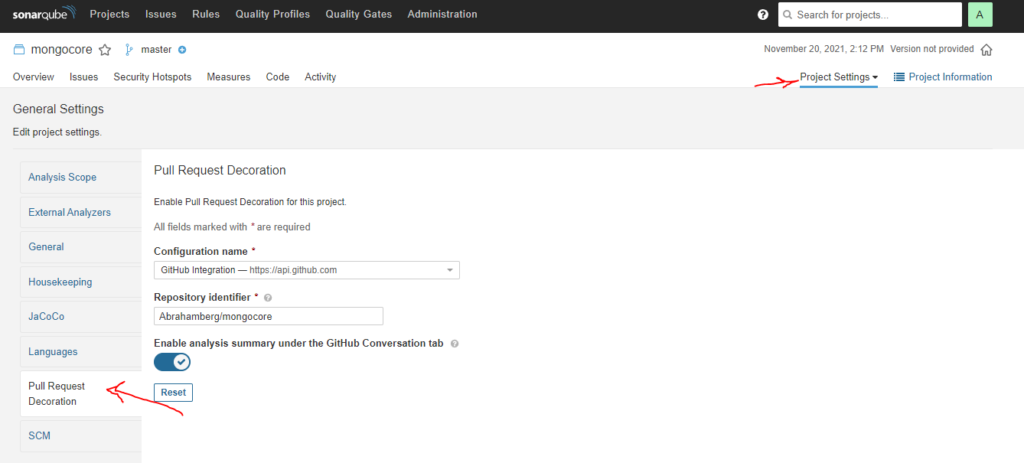
You should see the GitHub integration we created earlier and repo name correctly.
Pull Request Scan and Block based on Status
There is a good chance that SonarQube community does not send the status to pull request on GitHub. This is because the GitHub action workflow you created does not send enough information to SonarQube server for pull request analysis. (This is not the case for commercial version of SonarQube) GitHub actions sends sha1 for origin merge, which is different of sha1 of branch. Natan Deitch suggested a workaround here . It basically says to pass the sonar.scm.revision like this along side pull request information. For bash
-Dsonar.scm.revision=${{ github.event.pull_request.head.sha }}or powershell :
/d:sonar.scm.revision=${{ github.event.pull_request.head.sha }}So in case of dotnet scanner, I added some arguments to my dotnet-sonarscanner line like this: (make sure your default branch name is main and you are running PowerShell if you copy paste it)
.\.sonar\scanner\dotnet-sonarscanner begin /k:"_____MY_PROJECT_KEY_____" /d:sonar.login="${{ secrets.SONAR_TOKEN }}" /d:sonar.host.url="${{ secrets.SONAR_HOST_URL }}" /d:sonar.pullrequest.key=${{ github.event.number }} /d:sonar.pullrequest.branch=${{ github.event.pull_request.head.ref }} /d:sonar.pullrequest.base=master /d:sonar.scm.revision=${{ github.event.pull_request.head.sha }}To test things works as it should: create a new branch, make some changes (I did in my readme), create pull request and wait until your your build workflow is done. After a few moments SonarQube should post in your pull request conversation tab and Checks tab.

Also in your SonarQube portal you should see the pull requests
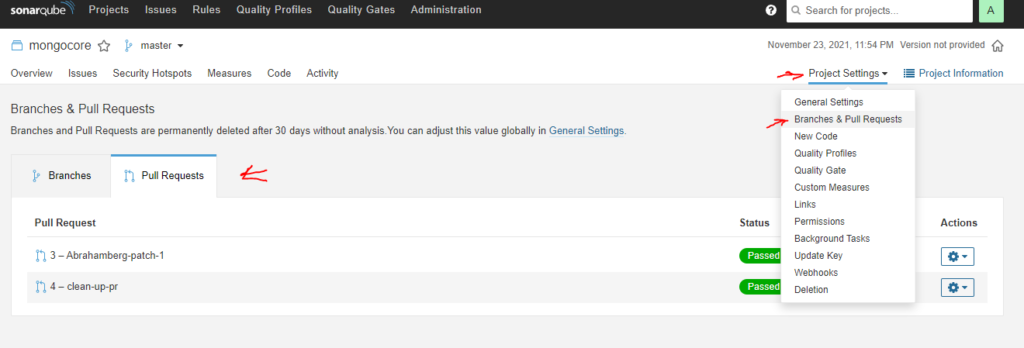
It this point, it is a good Idea to create a branch protection rule for both workflow to be successfully run your build and test (“Build” by default), and SonarQube status (“[PROJECT_NAME] SonarQube Results“) This status for commercial version of SonarQube is SonarQube quality gate
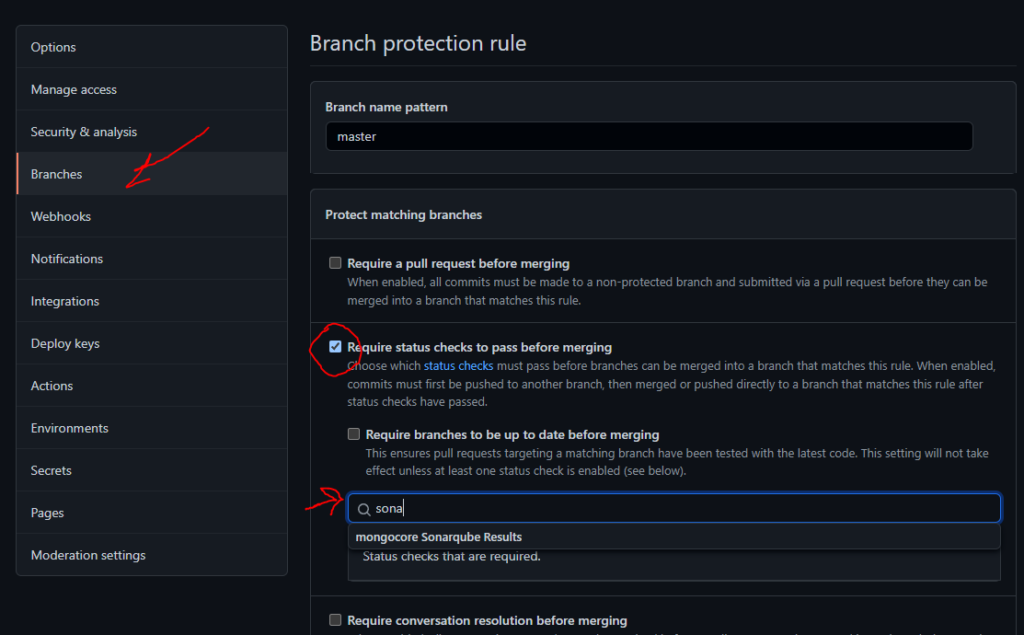
It is very strongly recommended to check Require a pull request before merging also. This way, all new code will be evaluated before it is merged to your code base.
Now that you did a great job securing your code you can pickups some badges and from SonarQube portal and add it to your readme file on your GitHub. You find them by clicking on Project information and selecting Get project badges.

Leave a Reply